
As the temperature rises during summer, your air conditioning system becomes an essential part of maintaining a comfortable indoor environment. However, like any other mechanical system, your AC may encounter problems that need prompt attention. Early recognition of these signs can prevent further damage and costly repairs.
Common Indicators Your AC Needs Professional Service
- Insufficient Cooling
If your air conditioner is no longer cooling your home effectively, this is a clear sign something is wrong. Whether it’s blowing warm air or struggling to maintain the set temperature, a professional inspection may be necessary to address potential underlying issues. - Frequent Cycling
Does your AC turn on and off more frequently than usual? This behavior, known as short cycling, might indicate problems with the thermostat, electrical components, or refrigerant levels. - Unusually High Energy Bills
A sudden spike in energy bills without an apparent reason often points to decreased efficiency in your air conditioning system. Components like dirty filters or malfunctioning compressors could be forcing the unit to work harder than it should. - Strange Smells or Noises
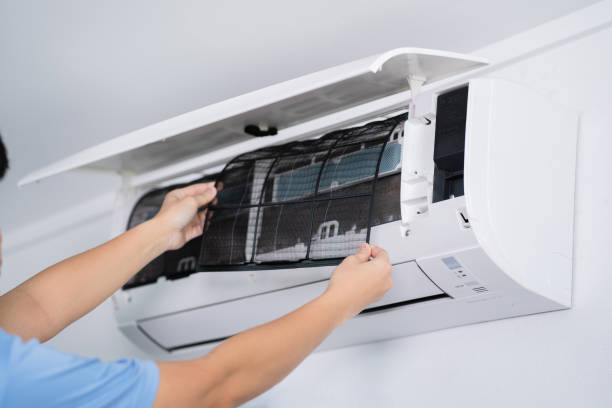
Foul odors such as burning smells or musty odors could indicate electrical issues or mold growth inside the system. Similarly, grinding, squealing, or banging noises suggest worn-out parts that need immediate attention. - Moisture Problems or Leaks
The presence of moisture around your AC unit isn’t normal and could result from issues such as refrigerant leaks or clogged drainage lines.
Why Addressing These Signs Matters
- Permanent damage to essential components like compressors and coils.
- Reduced comfort due to inefficient performance.
- Expensive repairs if minor problems escalate into major breakdowns.
- Decreased energy efficiency resulting in higher utility costs.
- Shortened lifespan of the overall system.
Actionable Steps for Homeowners
- Inspect Filters: Dirty filters can restrict airflow and reduce cooling efficiency. Replace them regularly based on manufacturer recommendations (typically every 1–3 months).
- Check Thermostat Settings: Ensure that the thermostat is set correctly and functioning properly. Switching from “auto” mode to “on” mode temporarily can help determine if there’s an airflow problem.
- Clean Around Outdoor Units: Leaves and debris around outdoor condenser units can obstruct airflow; keep this area clean for optimal performance.
If these troubleshooting steps don’t resolve the problem—or if you suspect something more serious—it’s essential to contact a licensed HVAC technician for professional service.
| Symptom | Potential Issue | Recommended Action |
| Weak Cooling | Low refrigerant levels | Contact an HVAC technician |
| Frequent Cycling | Faulty thermostat | Inspect thermostat wiring |
| Moisture Around Unit | Clogged drain line | Clean drain line/refer technician |
| Loud Noises | Worn motor bearings | Schedule professional repair |
By staying vigilant about these indicators and acting promptly when they arise, you can ensure your AC operates efficiently throughout the summer while avoiding unnecessary stress and expense.
Common Reasons for Weak or Warm Airflow and When to Seek Air Conditioning Repair Orlando, FL
Weak or warm airflow from your air conditioning system can significantly affect your comfort, especially during the summer months. This issue often indicates that your AC unit is not functioning efficiently and requires attention. Below, we explore potential causes of this problem and practical steps to address them.
Common Causes of Weak or Warm Airflow
- Dirty or clogged air filters restrict airflow, preventing your system from effectively cooling your home.
- Regularly replacing or cleaning filters, typically every 1–3 months, can resolve this issue.
- Leaks, cracks, or blockages in ductwork reduce the amount of cool air reaching different areas in your home.
- Professional inspection and sealing of ducts can restore proper airflow.
- Low refrigerant levels due to leaks may impede the cooling process, leading to warm air circulation.
- A licensed technician should locate and repair leaks before refilling refrigerant.
- Furniture, curtains, or other obstructions covering vents can limit airflow into rooms.
- Ensure all vents are clear and unobstructed for optimal performance.
- The blower fan is responsible for pushing air through the vents. If it’s damaged or malfunctioning, airflow will weaken.
- Repairs might involve lubricating mechanical parts, tightening loose belts, or replacing worn components.
Steps to Diagnose Weak Airflow
- Check if filters are clean or need replacement.
- Inspect visible duct connections for gaps.
- Listen for unusual noises near the blower motor that might indicate damage.
- Confirm vents aren’t blocked by household items.
- Monitor whether certain rooms are cooler than others—this often signals a duct issue.
Impact on Energy Efficiency
| Problematic Component | Consequence on Energy Efficiency |
| Clogged Filters | Higher energy use due to restricted airflow |
| Leaky Ducts | Cool air escapes before reaching designated spaces |
| Low Refrigerant Levels | Reduced cooling efficiency leads to prolonged runtimes |
| Malfunctioning Blower Fan | Inconsistent performance increases operational strain |
Addressing these issues promptly ensures consistent cooling while keeping energy bills manageable.
Preventive Maintenance Tips
- Schedule annual professional tune-ups to identify developing problems early.
- Replace filters regularly based on manufacturer recommendations.
- Keep outdoor units clear of debris like leaves and grass clippings for proper ventilation.
- Inspect ducts periodically for visible signs of wear and tear.
Ensuring proper maintenance not only resolves weak airflow but also extends the lifespan of your AC system while improving its overall efficiency during peak summer months.
Tips from a Trusted HVAC Company Orlando, FL on Addressing Strange or Loud Air Conditioner Noises
Strange or loud noises coming from your air conditioning unit are often an indication of underlying issues that require immediate attention. Regular operation of an AC system should be relatively quiet, so unusual sounds are a clear sign that something may not be functioning as it should. Below, we’ll explore common noises your AC might produce, their potential causes, and how to address them effectively.

Common Noises and Their Potential Causes
- Cause: A loose or broken part inside the compressor or fan assembly could cause banging sounds. These parts might include connecting rods, pistons, or other internal components.
- Solution: Turn off the system immediately to avoid further damage and contact a licensed HVAC professional for inspection and repairs.
- Cause: Repeated clicking when the system starts up could indicate an electrical issue in components such as the control panel or thermostat.
- Solution: This issue often requires professional troubleshooting to repair faulty wiring or replace malfunctioning electrical components.
- Cause: A humming noise may suggest a problem with the motor, refrigerant piping, or loose parts vibrating when the unit is running.
- Solution: Tighten any loose screws if accessible but call a technician if the noise persists.
- Cause: High-pitched squealing can indicate issues such as a worn belt (in older units) or motor bearings that need lubrication.
- Solution: If you notice this sound consistently, seek professional servicing to avoid damage to key components.
- Cause: Hissing may point towards refrigerant leaks in the coils or ductwork problems.
- Solution: Refrigerant-related issues should always be handled by certified technicians due to safety concerns and environmental regulations.
- Cause: Buzzing could stem from electrical issues like loose wires, failing capacitors, or problems with the condenser coil.
- Solution: Disconnect power to your AC unit and have it inspected by a qualified HVAC expert.
Steps for Troubleshooting
- Check for debris around outdoor units that might obstruct fans.
- Inspect vents for blockages caused by dirt accumulation or furniture placement.
- Tighten visible screws on panels if they appear loose.
- Replace HVAC filters regularly; clogged filters can lead to airflow imbalance and unusual sounds.
Preventative Maintenance Tips
| Maintenance Task | Frequency | Purpose |
| Clean/Replace Air Filters | Every 1–3 Months | Ensures proper airflow and reduces strain on components |
| Professional Inspection | Biannually (Spring/Fall) | Identifies early signs of wear and tear |
| Lubricate Moving Parts | Annually | Prevents squeaking and mechanical breakdowns |
| Clear Debris Around Unit | Monthly | Improves efficiency by ensuring unobstructed airflow |
By taking these steps consistently throughout your system’s life cycle, you can reduce unexpected breakdowns while keeping repair costs manageable over time.
Addressing loud noises promptly not only extends your AC unit’s lifespan but also ensures continued comfort during peak summer months without interruptions caused by malfunctions.
Exploring Reasons Behind Unusually High Energy Bills Caused by AC Issues
An unexpected spike in your energy bill during the summer months could be a warning sign that your air conditioning (AC) system is underperforming or facing issues. There are several potential reasons for this problem, and understanding them can help you take prompt action to restore efficiency and reduce costs.
Common Causes of High Energy Bills Related to Your AC
- When air filters are clogged with dust, debris, or allergens, your AC has to work harder to circulate air.
- This increased strain results in higher energy consumption.
- Regularly replacing or cleaning air filters every 1-3 months can prevent this issue.
- Damaged or improperly sealed ductwork allows cool air to escape into unconditioned spaces, such as attics or crawl spaces.
- Leaks in ducts reduce cooling efficiency and make the system consume more power to maintain the desired temperature.
- Professional duct sealing can address these losses effectively.
- Low refrigerant levels due to leaks or improper charging reduce the cooling capacity of your AC unit.
- This causes the compressor to run longer cycles, increasing energy usage.
- A licensed technician should inspect the refrigerant levels and address any leaks promptly.
- Older AC systems may lack energy-efficient features found in modern units.
- Worn-out components like compressors, fans, or capacitors make it harder for the system to operate efficiently.
- Upgrading an outdated unit can significantly lower electricity costs over time.
Proactive Steps for Prevention
- Schedule Routine Maintenance: Annual maintenance involves cleaning components, checking refrigerant levels, inspecting wiring, and ensuring that all parts operate optimally. Preventive care is often less expensive than reactive repairs.
- Invest in a Programmable Thermostat: A programmable thermostat ensures precise control over indoor temperatures based on occupancy schedules. This minimizes unnecessary cooling when no one is home.
- Seal Cracks and Insulation Gaps: Poor insulation forces your AC system to work harder by losing cool air through walls, windows, or doors. Inspecting and sealing these gaps with caulking or weatherstripping helps maintain consistent temperatures indoors.
Comparing Energy Costs from Faulty vs Well-Maintained Units
| Condition of AC Unit | Average Monthly Cost* | Approximate Yearly Savings with Maintenance |
| Poorly Maintained (Inefficient) | $150-$250 | $200-$500 |
| Well-Maintained (Efficient) | $100-$150 |
*Estimates vary depending on local electricity rates and unit size.
By identifying inefficiencies early and maintaining your air conditioner regularly, you can significantly reduce both energy bills and repair expenses while extending the lifespan of your cooling system.
What Moisture or Leaks Around Your Air Conditioner Could Mean for Its Efficiency
Moisture or leaks around your air conditioning unit are often overlooked, but they can be a clear indication that something isn’t functioning as it should. Addressing these issues promptly is essential to maintain the efficiency and longevity of your AC system. Let’s explore the potential causes and implications of this common problem, as well as steps you can take to resolve it.
Common Causes of Moisture or Leaks
- The condensate drain line removes excess moisture from the air during the cooling process.
- Over time, it may become clogged with dirt, mold, or debris, leading to water buildup and leaks.
- When refrigerant levels are low due to leaks, it can cause coils to freeze and melt, resulting in unusual moisture around your unit.
- This not only leads to inefficiency but can also harm surrounding surfaces.
- In some systems, a condensate pump moves collected water away from the unit.
- A malfunction in this pump may prevent proper drainage, allowing water to pool near your AC.
- Over time, the drip pan that collects condensation can rust or crack.
- A damaged pan will fail to hold water effectively, causing spills or leaks.
- High indoor humidity levels could overwhelm the AC’s ability to remove moisture efficiently.
- This may result in noticeable condensation forming around the unit.
Why Moisture Around Your AC Matters
- Reduced Efficiency: Water buildup impairs components like coils and motors, making the system work harder than necessary.
- Increased Mold Growth: Standing water encourages mold and mildew formation, which may spread allergens into your home.
- Structural Damage: Persistent leaks have the potential to damage walls, ceilings, and flooring close to the AC system.
Steps You Can Take
- Inspect Regularly: Check for visible signs of condensation near or underneath your unit during routine maintenance sessions.
- Clean Drain Lines: Flush out blocked lines using a mixture of bleach and water periodically to prevent clogs caused by debris buildup.
- Replace Drip Pans: If you notice cracks in your drip pan during inspections, replace it immediately before further damage occurs.
- Monitor Refrigerant Levels: Have a licensed technician check refrigerant levels annually since leaks require professional repairs.
- Install a Dehumidifier: To better manage humidity indoors, consider installing a whole-home dehumidifier alongside your AC system for optimal cooling performance.
| Problem | Likely Cause | Recommended Solution |
| Standing Water Nearby | Clogged Drain Line | Clean drain line using bleach solution |
| Excessive Condensation | High Humidity Levels | Install whole-home dehumidifier |
| Rusted Metal Components | Damaged Drip Pan | Replace drip pan immediately |
Proactively addressing these concerns not only enhances energy efficiency but also ensures a healthier indoor environment for you and your family all summer long.
Addressing Hot or Uneven Zones in Your Home with Expert AC Service Orlando
Hot or uneven zones in your home during the summer can be both uncomfortable and a clear indicator that your air conditioning system may not be operating efficiently. Understanding why this issue occurs and how to address it can save you from unnecessary frustration and high energy costs.
Common Causes of Hot or Uneven Zones
- Ducts distribute cooled air throughout your home, but if they are blocked or have leaks, certain rooms may not receive adequate airflow.
- Leaks can cause cooled air to escape before it reaches the intended area.
- An undersized unit might struggle to cool larger spaces effectively, leaving some areas warmer than others.
- Conversely, an oversized system may short cycle, cooling some zones quickly while leaving others under-cooled.
- Rooms with inadequate insulation allow heat to enter more easily, making it harder for your AC to maintain consistent temperatures across your home.
- Furniture, curtains, or other objects blocking vents reduce proper airflow distribution and cause uneven cooling.
- A thermostat located in a particularly hot or cold spot may misread the overall temperature of your home, leading to uneven cooling.
Steps to Address Uneven Cooling
- Inspect and Clean Ductwork: Ensure there are no obstructions like dirt, debris, or damage within the duct system. Seal any gaps with professional-grade duct tape to prevent air loss.
- Evaluate AC Size: Consult an HVAC professional to determine if your unit is appropriately sized for your home’s square footage and layout.
- Improve Insulation: Add insulation to walls, attics, and crawl spaces if needed to minimize heat gain during summer months.
- Unblock Vents: Rearrange furniture or remove obstacles that are covering supply registers.
- Utilize Zoning Systems: Install a zoning system with multiple thermostats that allow for precise control over individual areas within the home.
- Upgrade Thermostat: Replace outdated thermostats with programmable or smart models that more accurately monitor temperatures.
Table: Quick Fixes Based on Issue
| Problem | Solution | Approximate Cost |
| Blocked Vents | Clear obstructions | Free |
| Leaky Ducts | Seal ducts | $200-$600 |
| Poor Insulation | Install/upgrade insulation | $1-$3 per sq.ft |
| Thermostat Placement | Relocate thermostat | $100-$300 |
| Outdated System | Upgrade HVAC unit | $3,000-$7,000+ |
Preventative Measures
- Schedule regular maintenance for your HVAC system at least twice yearly (spring and fall).
- Monitor airflow from vents periodically to ensure consistent performance across rooms.
- Replace air filters every 1-3 months depending on usage levels and environmental conditions like pet hair or dust accumulation.
- Avoid drastic thermostat settings; small adjustments maintain balance without overloading the system.
Identifying hot spots early ensures timely solutions that enhance comfort while keeping energy efficiency intact throughout the season.
- Identifying Air Handler Issues and Finding Reliable Orlando, FL AC Repair
- Recognizing When You Need Air Conditioning Repair Orlando, FL Services
- Ensuring Comfort and Efficiency with Orlando, FL AC Repair
- Identifying When You Need Orlando, FL AC Repair for Your Air Conditioning Unit This Summer
- How often should you schedule Orlando, FL ac repair to ensure optimal performance
- 6 Key Signs You Need Immediate AC Service Orlando Residents Should Know
- Effective Solutions for Orlando, FL AC Repair and Common Problems